Sunday, January 22, 2017

Don't Be a Butthole Husband

I recently read a wonderful article entitled “Don’t be a butthole wife.” I apologize I do not remember the author's name, but the article was beautiful. The whole story was about how this woman’s first husband would leave dirty clothes laying around the house and how much that bothered the wife. The dirty laundry became a source of contention in her marriage, until her husband died unexpectedly. After his death she remarried and found picking up after her second husband a cherished act of service to someone that she loved. The act of cleaning up after her first husband was a cherished memory she was glad to repeat with her second husband.
I read the article. I teared up a bit. I loved it. I resolved to be a better, more understanding wife. I picked up socks and underwear with a better attitude. Then I became a bit angry, and somewhat sad. Now I don’t know how many fights were started, how miserable the wife made their home just because of a few dirty socks, but I started to think about how depressing this situation really was.
How many times did this wife ask him to please clean up after himself? How much of their precious time together was spent fighting over laundry? How many days could have been spent in harmony rather than dissent when these days were numbered?
These are the cherished memories that this man left behind? Now I’m sure there are other memories of family trips and fun, but this is the wonderful treasured moment that this woman clung to? What does that say about this man? That instead of spending two minutes to create harmony in the household he just refused to help and that’s what his wife remembers?
If the tables were turned, and the wife had died suddenly, and her husband was stuck finally having to clean up after himself, how guilty would he feel for making her pick up after him day after day even though she hated it.
Now we all know that this man that died was a wonderful husband and father, and sacrificed every day for his wife and children. But just because he could not spend a couple of minutes every day picking up after himself, his widow considers cleaning his dirty laundry to be one of the best memories she has. This doesn’t seem right to me. This doesn’t seem like a legacy that any man wants to leave behind.
Now some women may be a little too OCD. The man is not the only source of conflict. They may pick fights over dumb things. One of the essential parts of marriage is service. Knowing that your spouse is tired and helping them out even when it’s hard to bite your tongue. But should it be one of the favorite things you remember about your partner? And make that act of service extra special to your next marriage? I don’t think so. Sacrificing should not be one sided.
Men, just pick up your socks. Don’t let the best memories that you leave behind be picking up your dirty underwear off the floor. Don’t leave your wife with that. Make the memories that you leave behind happy ones of vacations and family dinners and tickle fights on the bed. Just pick it up. Spend that two minutes making your wife happy. It’s not hard. And the memories you leave behind will mean so much more to your loved ones.  


My hubby and daughter in the backyard, where we make many happy memories. 

Sunday, August 16, 2015

Cheese Making Made Easy(er) and What Do You Do With The Whey?

Woman, you are crazy.
Do you mean to tell me that you also make your own cheese? 
Yup. You bet. And it tastes great.
 AND it's easy. 
Way easier than you think.
I know, I know, you don't believe me, but it's true. 
And the rewards are endless. 


Not only do you get some delicious cheese to enjoy, but the whey can be used for so many delicious treats! 
First, let us look at the ingredients of the average bag of shredded cheese.


I know there are things about the food industry that I just don't understand, and I know there are reasons they add some of the ingredients they do, but what is all that?
If you have no clue what it is, you probably shouldn't be eating it.
Just sayin.

Cheese should be simple. Milk. Acid. Seasoning.
I use organic milk, a little salt, and one lemon.
Simple. Delicious. Easy.


I used up about half a gallon of organic milk in the recipe.
I put that on the stove in a medium pan on medium-high heat.
Make sure to use a thermometer. I just used my meat thermometer. It's what I had, it worked, great!
Stirring continuously, heat the milk up to 165-185 degrees. Before it is boiling.
 No boiling allowed.


When that is done, take the milk off of the heat and add the juice of one lemon.
Very slowly, about 2 tablespoons at a time.


Don't worry, you will know when the curds separate from the whey.
It will look like this!


The only gross part of the process, it doesn't smell or anything, just looks really funny.
Just let it sit and separate for about 20 minutes.

Now comes the job of separating the curds and the whey.
I used a small strainer, two layers of cheesecloth, and a bowl to catch the whey.


Then you pour the whole mixture from the pot into the cheesecloth.


The whey runs into the bowl, and the curds are left behind. I leave them straining like this for about 20 minutes.
Then I take all the curds that are left over and form them with my fingers into a small patty of cheese.


 I also add about 2 teaspoons of salt, for flavor.
We as a culture eat way too much salt and add too much salt to everything, like cheese.
But without a little salt, the homemade cheese tastes like eating milk. 
Very bland.
So add a little salt. It's still better for you than store bought.


When the patty of cheese is formed, I then twist it into the cheesecloth and weigh it down with a full mason jar. This presses the cheese into an actual form. If you would like this cheese to stay crumbly, like for a salad topping, then skip this step and just strain the curds for another hour.


And then voila! You have about 6 ounces of delicious cheese!
You must refrigerate, it stays good for about a week.
It is very soft and delicious, good with fruit.
Honestly, this cheese recipe reminds me of goat cheese.


It is also delicious on salads, here is an example of a salad that I put some of this fresh, tasty cheese on.


Now wait a minute here, little hippie person, what about all that whey? What about your mantra of wasting nothing?
Hold on, there are so many uses for the whey! Just google it and try some.

One use for whey is to tenderize meat.
So I decided to try it with some skirt steak and make some fajitas!
I took about 1 cups of whey, 1 pound of sliced skirt steak, and a packet of fajita seasoning (courtesy of McCormick) and marinated the skirt steak for 3 nights.


I then fried the steak in 3 tablespoons of oil with some onions and peppers.
IT WAS SO GOOD!
Not just tasty, DELICIOUS! Melt in your mouth tender with tons of flavor.
And of course I topped my fajitas off with some of the fresh cheese that I made.
So. Good.


I also used the whey to make a lemon merengue dessert that I found a recipe for here:
I did make it a little lighter by putting in less sugar and skipping the crust.
I baked them in individual cups for the same amount of time as the pie recipe.

But so delicious. So lemony smooth and tasty.


I ate the whole recipe worth in 2 days.
Not the eating habits I recommend, but it was so good, how can you stop eating it?
Live a little people.


So if for some reason you think you are not creative enough, or smart enough, or have enough time to make your own cheese, this recipe is for you! 
Easy. Simple. Good.
The way that food is meant to be.


Saturday, August 8, 2015

Blueberry Pie Baby Food Recipe

Blueberry Pie? For a baby?
Well, not really, but it tastes just as good!
And, of course, is way better for your baby than shoving pie down their precious little throat.

I recommend this baby food for 6 months and older, though you can also read some age appropriate recommendations here: http://www.babycenter.com/0_age-by-age-guide-to-feeding-your-baby_1400680.bc

As always, please please read my disclaimer before making any of my baby food recipes. 


Blueberries.... YUM! I buy them at the farmer's market in Holland and they are so sweet and delicious. 
Read about why we should all be eating them here:

I use two cups of blueberries, two organic bananas, two organic apples (any kind really), and one small acorn squash as my fruit base. 


Take the squash, cut it in half, remove the gross insides, and place upside down in two cups of water, as shown. Bake at 375 degrees for about an hour, until they are soft and mushy. 
Save the squash water if you aren't using milk or breastmilk.

So, you have an hour to go do whatever, laundry? Bake? I dunno. Trim your toenails for all I care.


When it's done I take whatever is left of the squash water, usually 1 cup, the bananas, the apples (peeled and sliced), the squash, and the blueberries and put them in a medium sized pan on medium heat. 
As always, I recommend breastmilk if under a year, and whole milk if your baby is over a year old instead of squash water. I have my reasons for using the squash water instead, and you are more than welcome to use it for the same reasons, but my recommendation is always milk.


I also add 3 tablespoons of olive oil, 2 tablespoons of lemon juice, and 1 tsp of cinnamon for flavor.
Want to know why I add these weird things? Again, please read my disclaimer here:
http://justalittlehippie.blogspot.com/p/blog-page.html

Be careful with the lemon juice, or skip it, if you are using milk instead of squash water, it will cause the milk to separate.

When that deliciousness is all cooked and mushy, I add 1 and 1/2 cups of oatmeal. I use quick oats, but whatever is handy will do. Please remember that since there is oatmeal added to this recipe, there is no need to add any more baby cereal.


Read about why we should eat bananas here:
Read about the health benefits of acorn squash here: 
And some reasons to eat apples, any kind, here:


When it is all thoroughly cooked and smelling delicious, then it is time to blend, process, or otherwise use an electrical device to make your baby's food smooth and easy to swallow.

REMEMBER: BLUEBERRIES STAIN!
Please use a bib and be careful with this delicious baby food, unfortunately it does stain their cute little clothes.


And there it is! All done! Time to eat! 
It is so good. I love the delicious blueberry flavor and all the extra nutrition all packed into a tiny bowl. This recipe makes the baby food very thick, and then I add some milk to the baby food on a bowl to bowl basis to thin it out and add a little more nutrition. If you used the squash water, I recommend that you do the same.

This recipe makes 7 cups of baby food and stays fresh in the fridge for a week. You may freeze it for up to 3 months.

Enjoy!


Blueberry Pie Baby Food Recipe
2 apples (sliced and peeled)
2 bananas
2 c. blueberries
1 acorn squash
2 c. water
1 and 1/2 c. quick oats
2 T. lemon juice
3 T. olive oil
1 t. cinnamon

Slice squash, remove seeds, place face down in 2 cups of water and bake at 375 for 1 hour. Combine cooked squash with the water from the pan*, the bananas, the apples, and the blueberries in a medium pan on medium heat. Add the lemon juice, olive oil, and cinnamon. Cook thoroughly, about 20 min. Add oats. When fully cooked blend or food process until smooth. Allow to cool fully before feeding to your baby. Makes 7 cups. Refrigerate for 1 week. May freeze for 3 months.

*My recommendation is always to use breastmilk for under 1 year and whole milk for over 1 year of age. Add 1 cup of milk for this recipe.  

Sunday, July 19, 2015

Homemade Organic Granola Bars Made Easy(er)

Homemade Granola Bars! 
Yum yum!
And so much better for you. I make them with almost all organic ingredients, and no sugar.
No unknown strange chemicals, no high fructose corn syrup, no guilt!
You would think they are hard to make, but with some simple instruction, they are no problem. I make them at least once a week, and they are scrumptious!


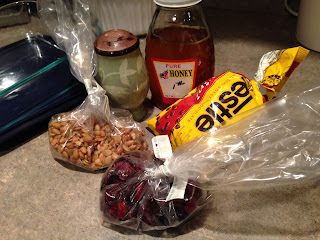
What you need:
Rolled Oats
Honey
Pumpkin Seeds
Sliced Almonds
Salt
Vanilla Extract
Dried Cranberries
Peanut Butter


That's IT!
I feel good about all of these ingredients. All good things.
Here's some info on the health benefits of pumpkin seeds: 
Here's some interesting facts about almonds: 
And here's some reasons to eat cranberries:

First you take 2 cups of rolled oats and lay them out flat on a baking sheet. 
Heat the oven up to 375 degrees and place the oats in the oven to toast.


For me the toasting usually takes about 15 minutes, I would check on them frequently. When they start to turn golden on top, they are done.
Like this:


Take it out of the oven and let them cool.

While they are toasting I mix 1/2 a cup of dried cranberries, 1/4 cup of sliced almonds, 1/8 teaspoon of salt, and 1/2 cup of pumpkin seeds in a large bowl. 
The almonds aren't in the pic. Sorry. Frowny face.


Then I also mix 1 teaspoon of vanilla, 2 full tablespoons of peanut butter, and 1/2 cup of honey in a small pot on low heat on the stove. Stir frequently until all the peanut butter is smooth and mixed in with the honey. Do NOT let it boil. Just warm it up, stir it up, your good. 


I then mix all the wet and dry ingredients in the large bowl. I wait a few minutes to let everything cool down before I put in 1/4 cup of chocolate chips. Otherwise they just melt. They usually melt a bit anyway but this way you still get the bits of chocolate instead of just melted goo.

Press the mixture into a greased 9 x 9 pan. It should be sticky but not wet.


I like my granola bars chewy on the inside but with a little crunch on the outside so I bake them for 12 minutes at 375 degrees. If you like them chewy I would only do 8 minutes. If you like them very crunchy, go a bit longer about 15 minutes, but watch closely so they don't burn.

Let them cool fully before cutting into desired sizes. Otherwise they will crumble. They still might crumble some, that's ok (they're homemade, not store bought!) but to reduce it wait until they are cooled down.


And there you go!
This is a pretty basic recipe, and if you want to add different dry ingredients, go for it! Just keep the ratios the same or your will get a granola bar that is either too crumbly (still makes good cereal) or too wet (sometimes just bake it a bit longer, still a good snack). 

Another tip: I have started getting all my ingredients in bulk at the natural health food store. The cost is significantly less. Except the chocolate chips. I still can't bring myself to fork out the cash for organic chocolate (it ain't cheap) but the bulk section is my friend for oats, pumpkin seeds, and cranberries.

Happy Baking!


Organic Granola Bars
2 c. rolled oats
1/2 c. honey
1/2 c. dried cranberries
1/2 c. pumpkin seeds
1/4 cup sliced almonds
1/4 cups chocolate chips
2 T. peanut butter
1 t. vanilla extract
1/8 t. salt

Toast the rolled oats on a baking sheet, spread out, for 15 minutes at 375 degrees. Allow to cool. Mix salt, almonds, pumpkin seeds, and cranberries in large mixing bowl. Warm on stove in small pot peanut butter, vanilla, and honey. Stir frequently until smooth.  Mix all ingredients minus chocolate chips in large bowl. Allow to cool for 5 minutes, then add chocolate chips. Press into greased 9x9 baking pan and bake for 12 minutes on 375 degrees. Allow to fully cool before cutting into desired pieces.

Thursday, July 16, 2015

Tropical Treat Baby Food Recipe

This baby food recipe is the perfect mix to give your little one when they have a cold or are a little rundown. It is full of vitamin C and lots of nutrients to help them heal quicker.

Please always read my baby food disclaimer before making any of my delicious recipes.
http://justalittlehippie.blogspot.com/p/blog-page.html

I recommend this baby food for 6 months of age and older.
Here are some guidelines for age and introducing new foods:
 http://www.babycenter.com/baby-solid-feeding-basics


This recipe starts with 2 organic bananas, 2 organic mangos, 1 medium sized organic sweet potato, and 2 cups of 100% orange juice.
Of course I do recommend that you use breastmilk if your child is under 1 year, instead of the orange juice. Please be careful when using with lemon juice, as the acidity of the lemon will cause your breastmilk to separate. Maybe even skip it.


I feel no guilt about the orange juice as it adds some flavor and I always use 100%. No Sunny D for this mama's baby.
Naturally I just chop up the sweet potato, bananas, mangos, and put them in a medium sized pan on medium heat with the cup of orange juice. 
Here are the health benefits of sweet potatoes:
I didn't know they had so much Vitamin A in them! 


Here's some info on why we should eat mangos: 
And here's some reasons we should eat bananas: 

Stir occasionally. 
Let it cook until the sweet potato is soft and mushy, it usually takes me about 30-40 minutes.
Add 1 cup of natural quick oats to the mixture. 
You may have to add a splash of orange juice to keep keep it from getting too thick. I make mine thick and then add some mild when I heat it up on an individual bowl basis so that she still gets some milk in her food, but it doesn't spoil as quickly.


I also add 3 Tablespoons of Olive Oil, 2 Tablespoons of Lemon Juice, and 1 Teaspoon of Cinnamon.
Here are a few reasons we should eat cinnamon:
Again, always refer to my disclaimer on some of the ingredients that I add.


After it's all cooked up, time to blend, or make silky smooth in whatever process that you deem fit.
Do you like my ninja? It's band new, a present from my hubby and works FABULOUS!
Of course always cool before feeding to your little one.
This recipe makes about 6 cups of baby food. Feel free to freeze some.


And there you have it! A delicious treat for you baby that due to the mangos and orange juice have so much Vitamin C, they surely will be back to their happy healthy selves in no time!

Don't forget to take a bite!
 It. Is. Delicious.

Of course, I must share a pic of my adorable little one giving me such a big grin while she eats her Tropical Treat Baby Food that her eyes are almost shut!
What a cutie.


Tropical Treat Baby Food
2 cups 100% orange juice*
1 cup quick oats
1 medium sweet potato
2 mangos
2 bananas
1 t. cinnamon
3 T. olive oil
2 T. lemon juice

Chop up sweet potato, mangos, and bananas. Combine with orange juice in medium pan on medium heat. Add cinnamon, lemon juice, and olive oil. Stir occasionally. When sweet potato is fully cooked, add 1 cup of quick oats. When oats are cooked, blend or food process until smooth. Allow to cool fully before feeding to baby. Stays fresh in fridge for 1 week, frozen for 3 months.

*I do recommend 2 cups of breastmilk for ages under 1 year instead of orange juice. 

Sunday, July 12, 2015

Three Bean Salad Baby Food Recipe


Time required: minimal.
Difficulty level: easy.
Cost: low.
Excitement: palpable.

Let's do this.

As always, please please please read my disclaimer before making any of my baby recipes.

So this baby food recipe isn't really a salad, but there are 3 types of beans in it along with some broccoli, onion, and potato. 
I started feeding this to my child around 10 months of age. Here are some age food introduction guidelines: http://www.babycenter.com/0_age-by-age-guide-to-feeding-your-baby_1400680.bc


Beans are so good for us. They are an excellent source of protein. And if you are nervous about that one year old iron blood level test, this is the perfect recipe to boost your child's iron level and decrease your anxiety.
I get a can of green beans, a can of garbanzo beans, and a can of pinto beans. I prefer organic, but it is subject to availability. I also use 2 medium sized potatoes, half an onion, and a small head of broccoli.


Here's why we should be eating garbanzo beans: http://healthyeating.sfgate.com/nutrients-benefits-chick-peas-garbanzo-beans-7490.html
Here's some reasons why we should eat green beans: https://www.organicfacts.net/health-benefits/vegetable/green-beans.html
And here's why we should be eating pinto beans: http://healthyeating.sfgate.com/pinto-beans-healthy-3779.html

I drain the water from the pinto beans, it has too much sodium for my liking.  Always get the lower sodium version of any canned product or watch the sodium level on the nutritional facts. As a general rule, if the canned product has more than 200mg of sodium in it I avoid it. I have no science to prove my theory, that is just my habit. Here's a link as to why babies should not have added salt in their diet:


I also add 3 tablespoons of Olive Oil, 2 tablespoons of lemon juice, and 1 teaspoon of garlic powder. The garlic powder adds just a little flavor that makes this dish much more palatable. 
Here's an interesting read on the health benefits of eating garlic:


I also chop up the broccoli, the onion, and the potatoes into small pieces. I leave the skins on the potatoes in order to add extra nutrients. Please note that there are carbs already in this baby food dish so there is no need to add rice cereal or any other carbohydrate.
Here's a link as to why the skins of potatoes are good for you: http://healthyeating.sfgate.com/benefits-eating-potato-skins-4077.html.
And a link to health benefits of broccoli: http://www.livescience.com/45408-broccoli-nutrition.html
And information on the health benefits of onions: http://www.livescience.com/45293-onion-nutrition.html though I will add if you have a very gassy baby, I would forgo the onion.


I put all of the ingredients in a medium sized pot on medium heat on the stove.  I add the water from the garbanzo beans because it's packed with nutrients and the water from the green beans just for a little flavor. This is where you could also skip adding the water from the two bean cans and use breastmilk, or whole milk, which is what I highly recommend. It would be about 1 and 1/2 cups. If you are using breastmilk, please be careful with the lemon juice as it will cause your milk to separate. 

Put the top on, stir occasionally, and cook until the potato chunks are soft and mushy.


It will start to smell amazing. 
My goal with this recipe is one that does not take a lot of time, nor is difficult to follow. I have used fresh ingredients, and soaked beans, but this time my aim is ease, and helping the new mom get comfortable making some delicious food for her baby.


After fully cooked, it's time to blend! (or process, or whatever)
And TADA! 
You have some delicious (go ahead, try it!) baby food that is full of good vitamins, iron, and protein. Easy to cook, easy to eat!
Enjoy!


Three Bean Salad Baby Food Recipe
2 medium potatoes
1/2 onion
1 small head of broccoli
3 T. olive oil
2 T. lemon juice
1 t. garlic powder
1 can garbanzo beans (including water)
1 can green beans (including water)
1 can pinto beans (drained)*

Combine all ingredients in medium sized pot on stovetop on medium heat. Stir occasionally. When potatoes are fully cooked, blend or food process until smooth. Remains fresh in fridge for 7 days, may be frozen for 3 months.

*Instead of using the water from the two cans of beans I highly recommend using 1 1/2 cups of breastmilk if under 1 and whole milk if age is greater than 1.