Sunday, July 19, 2015

Homemade Organic Granola Bars Made Easy(er)

Homemade Granola Bars! 
Yum yum!
And so much better for you. I make them with almost all organic ingredients, and no sugar.
No unknown strange chemicals, no high fructose corn syrup, no guilt!
You would think they are hard to make, but with some simple instruction, they are no problem. I make them at least once a week, and they are scrumptious!


What you need:
Rolled Oats
Honey
Pumpkin Seeds
Sliced Almonds
Salt
Vanilla Extract
Dried Cranberries
Peanut Butter


That's IT!
I feel good about all of these ingredients. All good things.
Here's some info on the health benefits of pumpkin seeds: 
Here's some interesting facts about almonds: 
And here's some reasons to eat cranberries:

First you take 2 cups of rolled oats and lay them out flat on a baking sheet. 
Heat the oven up to 375 degrees and place the oats in the oven to toast.


For me the toasting usually takes about 15 minutes, I would check on them frequently. When they start to turn golden on top, they are done.
Like this:


Take it out of the oven and let them cool.

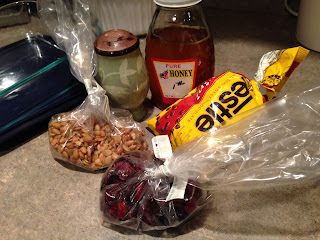
While they are toasting I mix 1/2 a cup of dried cranberries, 1/4 cup of sliced almonds, 1/8 teaspoon of salt, and 1/2 cup of pumpkin seeds in a large bowl. 
The almonds aren't in the pic. Sorry. Frowny face.


Then I also mix 1 teaspoon of vanilla, 2 full tablespoons of peanut butter, and 1/2 cup of honey in a small pot on low heat on the stove. Stir frequently until all the peanut butter is smooth and mixed in with the honey. Do NOT let it boil. Just warm it up, stir it up, your good. 


I then mix all the wet and dry ingredients in the large bowl. I wait a few minutes to let everything cool down before I put in 1/4 cup of chocolate chips. Otherwise they just melt. They usually melt a bit anyway but this way you still get the bits of chocolate instead of just melted goo.

Press the mixture into a greased 9 x 9 pan. It should be sticky but not wet.


I like my granola bars chewy on the inside but with a little crunch on the outside so I bake them for 12 minutes at 375 degrees. If you like them chewy I would only do 8 minutes. If you like them very crunchy, go a bit longer about 15 minutes, but watch closely so they don't burn.

Let them cool fully before cutting into desired sizes. Otherwise they will crumble. They still might crumble some, that's ok (they're homemade, not store bought!) but to reduce it wait until they are cooled down.


And there you go!
This is a pretty basic recipe, and if you want to add different dry ingredients, go for it! Just keep the ratios the same or your will get a granola bar that is either too crumbly (still makes good cereal) or too wet (sometimes just bake it a bit longer, still a good snack). 

Another tip: I have started getting all my ingredients in bulk at the natural health food store. The cost is significantly less. Except the chocolate chips. I still can't bring myself to fork out the cash for organic chocolate (it ain't cheap) but the bulk section is my friend for oats, pumpkin seeds, and cranberries.

Happy Baking!


Organic Granola Bars
2 c. rolled oats
1/2 c. honey
1/2 c. dried cranberries
1/2 c. pumpkin seeds
1/4 cup sliced almonds
1/4 cups chocolate chips
2 T. peanut butter
1 t. vanilla extract
1/8 t. salt

Toast the rolled oats on a baking sheet, spread out, for 15 minutes at 375 degrees. Allow to cool. Mix salt, almonds, pumpkin seeds, and cranberries in large mixing bowl. Warm on stove in small pot peanut butter, vanilla, and honey. Stir frequently until smooth.  Mix all ingredients minus chocolate chips in large bowl. Allow to cool for 5 minutes, then add chocolate chips. Press into greased 9x9 baking pan and bake for 12 minutes on 375 degrees. Allow to fully cool before cutting into desired pieces.

Thursday, July 16, 2015

Tropical Treat Baby Food Recipe

This baby food recipe is the perfect mix to give your little one when they have a cold or are a little rundown. It is full of vitamin C and lots of nutrients to help them heal quicker.

Please always read my baby food disclaimer before making any of my delicious recipes.
http://justalittlehippie.blogspot.com/p/blog-page.html

I recommend this baby food for 6 months of age and older.
Here are some guidelines for age and introducing new foods:
 http://www.babycenter.com/baby-solid-feeding-basics


This recipe starts with 2 organic bananas, 2 organic mangos, 1 medium sized organic sweet potato, and 2 cups of 100% orange juice.
Of course I do recommend that you use breastmilk if your child is under 1 year, instead of the orange juice. Please be careful when using with lemon juice, as the acidity of the lemon will cause your breastmilk to separate. Maybe even skip it.


I feel no guilt about the orange juice as it adds some flavor and I always use 100%. No Sunny D for this mama's baby.
Naturally I just chop up the sweet potato, bananas, mangos, and put them in a medium sized pan on medium heat with the cup of orange juice. 
Here are the health benefits of sweet potatoes:
I didn't know they had so much Vitamin A in them! 


Here's some info on why we should eat mangos: 
And here's some reasons we should eat bananas: 

Stir occasionally. 
Let it cook until the sweet potato is soft and mushy, it usually takes me about 30-40 minutes.
Add 1 cup of natural quick oats to the mixture. 
You may have to add a splash of orange juice to keep keep it from getting too thick. I make mine thick and then add some mild when I heat it up on an individual bowl basis so that she still gets some milk in her food, but it doesn't spoil as quickly.


I also add 3 Tablespoons of Olive Oil, 2 Tablespoons of Lemon Juice, and 1 Teaspoon of Cinnamon.
Here are a few reasons we should eat cinnamon:
Again, always refer to my disclaimer on some of the ingredients that I add.


After it's all cooked up, time to blend, or make silky smooth in whatever process that you deem fit.
Do you like my ninja? It's band new, a present from my hubby and works FABULOUS!
Of course always cool before feeding to your little one.
This recipe makes about 6 cups of baby food. Feel free to freeze some.


And there you have it! A delicious treat for you baby that due to the mangos and orange juice have so much Vitamin C, they surely will be back to their happy healthy selves in no time!

Don't forget to take a bite!
 It. Is. Delicious.

Of course, I must share a pic of my adorable little one giving me such a big grin while she eats her Tropical Treat Baby Food that her eyes are almost shut!
What a cutie.


Tropical Treat Baby Food
2 cups 100% orange juice*
1 cup quick oats
1 medium sweet potato
2 mangos
2 bananas
1 t. cinnamon
3 T. olive oil
2 T. lemon juice

Chop up sweet potato, mangos, and bananas. Combine with orange juice in medium pan on medium heat. Add cinnamon, lemon juice, and olive oil. Stir occasionally. When sweet potato is fully cooked, add 1 cup of quick oats. When oats are cooked, blend or food process until smooth. Allow to cool fully before feeding to baby. Stays fresh in fridge for 1 week, frozen for 3 months.

*I do recommend 2 cups of breastmilk for ages under 1 year instead of orange juice. 

Sunday, July 12, 2015

Three Bean Salad Baby Food Recipe


Time required: minimal.
Difficulty level: easy.
Cost: low.
Excitement: palpable.

Let's do this.

As always, please please please read my disclaimer before making any of my baby recipes.

So this baby food recipe isn't really a salad, but there are 3 types of beans in it along with some broccoli, onion, and potato. 
I started feeding this to my child around 10 months of age. Here are some age food introduction guidelines: http://www.babycenter.com/0_age-by-age-guide-to-feeding-your-baby_1400680.bc


Beans are so good for us. They are an excellent source of protein. And if you are nervous about that one year old iron blood level test, this is the perfect recipe to boost your child's iron level and decrease your anxiety.
I get a can of green beans, a can of garbanzo beans, and a can of pinto beans. I prefer organic, but it is subject to availability. I also use 2 medium sized potatoes, half an onion, and a small head of broccoli.


Here's why we should be eating garbanzo beans: http://healthyeating.sfgate.com/nutrients-benefits-chick-peas-garbanzo-beans-7490.html
Here's some reasons why we should eat green beans: https://www.organicfacts.net/health-benefits/vegetable/green-beans.html
And here's why we should be eating pinto beans: http://healthyeating.sfgate.com/pinto-beans-healthy-3779.html

I drain the water from the pinto beans, it has too much sodium for my liking.  Always get the lower sodium version of any canned product or watch the sodium level on the nutritional facts. As a general rule, if the canned product has more than 200mg of sodium in it I avoid it. I have no science to prove my theory, that is just my habit. Here's a link as to why babies should not have added salt in their diet:


I also add 3 tablespoons of Olive Oil, 2 tablespoons of lemon juice, and 1 teaspoon of garlic powder. The garlic powder adds just a little flavor that makes this dish much more palatable. 
Here's an interesting read on the health benefits of eating garlic:


I also chop up the broccoli, the onion, and the potatoes into small pieces. I leave the skins on the potatoes in order to add extra nutrients. Please note that there are carbs already in this baby food dish so there is no need to add rice cereal or any other carbohydrate.
Here's a link as to why the skins of potatoes are good for you: http://healthyeating.sfgate.com/benefits-eating-potato-skins-4077.html.
And a link to health benefits of broccoli: http://www.livescience.com/45408-broccoli-nutrition.html
And information on the health benefits of onions: http://www.livescience.com/45293-onion-nutrition.html though I will add if you have a very gassy baby, I would forgo the onion.


I put all of the ingredients in a medium sized pot on medium heat on the stove.  I add the water from the garbanzo beans because it's packed with nutrients and the water from the green beans just for a little flavor. This is where you could also skip adding the water from the two bean cans and use breastmilk, or whole milk, which is what I highly recommend. It would be about 1 and 1/2 cups. If you are using breastmilk, please be careful with the lemon juice as it will cause your milk to separate. 

Put the top on, stir occasionally, and cook until the potato chunks are soft and mushy.


It will start to smell amazing. 
My goal with this recipe is one that does not take a lot of time, nor is difficult to follow. I have used fresh ingredients, and soaked beans, but this time my aim is ease, and helping the new mom get comfortable making some delicious food for her baby.


After fully cooked, it's time to blend! (or process, or whatever)
And TADA! 
You have some delicious (go ahead, try it!) baby food that is full of good vitamins, iron, and protein. Easy to cook, easy to eat!
Enjoy!


Three Bean Salad Baby Food Recipe
2 medium potatoes
1/2 onion
1 small head of broccoli
3 T. olive oil
2 T. lemon juice
1 t. garlic powder
1 can garbanzo beans (including water)
1 can green beans (including water)
1 can pinto beans (drained)*

Combine all ingredients in medium sized pot on stovetop on medium heat. Stir occasionally. When potatoes are fully cooked, blend or food process until smooth. Remains fresh in fridge for 7 days, may be frozen for 3 months.

*Instead of using the water from the two cans of beans I highly recommend using 1 1/2 cups of breastmilk if under 1 and whole milk if age is greater than 1.

Wednesday, July 8, 2015

Whole Wheat Organic Bread Made Easy(er)

Whole Wheat Organic Bread Made Easy(er)

Before we begin, I must let you know that I got the basics for my recipe from:
I did alter the recipe in a few ways that made vast improvements, but if you would rather trust the flour company, that's ok. They also have you do a lot of extra steps that I found completely unnecessary to a delicious loaf.


Bread baking. Doesn't seem like it should be too hard. I mean 100 years ago, everybody was doing it. There has to be a way to simplify the baking of bread so that the average person doesn't really mind baking some up once in a while. Bread machines are great, but I'd rather spend my money on a day at the spa or something and use my hands. My goal with this blog entry was to simplify the process of bread baking so that anyone can do it, and not feel overwhelmed.

And another thing that bugs me: what are all the ingredients in store bought bread? 
Here's an example.


Bleached flour? Abcorbic Acid? Calcium Peroxide? High Fructose Corn Syrup? 
Good Heavens!
Now I do know some things on there, and I know others have a purpose for preserving and vitamins, but come on! I'm not even going to try to google all of those to figure it out. 

Bread should be simple. Flour. Yeast. Water. Sugar (to activate the yeast). Why is it so complicated when I look at this label?

I'm all about simple. I'm all about knowing what the heck I'm eating every day. And I am all about easy. I found a recipe that wasn't hard and altered it a little after baking bread several times to make a loaf of organic whole wheat bread that is so tasty and I feel good about eating. All the ingredients I use are organic, except the salt and yeast.

These are the ingredients in this bread recipe, I forgot the honey in the pic though. Oops.

Whole wheat flour 3 and 1/2 cups
1 cup warm water
Honey 2 Tablespoons
Yeast 2 and 1/2 teaspoons
Salt 1/8 teaspoon
Butter 4 Tablespoons 
1 medium sized potato
Milk 1/2 cup


That's it! Simple. I love it!

The first step is to peel and slice a medium sized potato. The potato brings moisture and really adds a nice flavor. Then you cover it in hot water and boil it on the stove until they are cooked very thoroughly. That usually takes around 20 min. 


While that is happening, I take 1 cup of warm water, and 2 and 1/2 teaspoons of rapid rise yeast and dissolve the yeast completely in the warm water. Let it sit and stir your potatoes.


Once the potato is cooked well, mash it up very well with a fork so that it is smooth, like mashed potatoes. The recipe recommends that you blend it but I have found if you mush it very well and put a little elbow grease into it, you don't have to clean a blender. Yay!
It should look like this:


Then take 1/2 a cup of warm milk, 4 tablespoons of warm butter, 1/8 teaspoons of salt, and 2 tablespoons of honey all together, with the yeast water and the mashed potatoes.
Instead of butter I use an organic spread made out of coconut oil and that works just as well, butter adds a little more flavor, so it's up to you.


Then you add 3 cups of whole wheat organic flour. 
This can be pricey, but I find I usually spend about $2.50 on a loaf of bread, which is easy to do on store bought bread anyway.
Knead the dough for a few minutes until it is well mixed. I just knead it right in the bowl. You may have to add another 1/4 to 1/2 cup to the bottom of the bowl while you knead to made sure the dough is formed but very slightly sticky still.  
Then I just throw the bowl into a sink full of hot water to rise. 
Well don't throw it, set it gently. Like this:


Let it sit there until it is about doubled in size, that usually takes me about an hour. Time to do other chores. Goody.
It will look like this:


Then I just take it out of the bowl and place it in a greased 9 x 5 bread pan. Then I put fresh hot water in the sink and let it set in there to rise again. 
See?


Be careful to not fill the sink too full so that no water gets into the pan. I usually have it in the hot water another hour, yours may take a little longer. It will almost double in size again, and be about 1/2 inch above the pan and look like this:


Preheat the oven at 350 degrees. Then once the bread has risen, I put it in for 40 minutes. Bake until you can poke it with a fork and the fork comes out clean.
I usually just set mine on the windowsill (how country of me!) or on top of the oven to cool. If you want to use a wire rack like in my first picture, go for it.

And that's it! It seems time consuming with all the rising and baking times, but really I just start it in the morning and while the bread is rising go about my business. By cutting out some steps in the original recipe I found that baking this bread was much easier and had less clean up time. I also added more yeast than the original recipe because I found the bread rose better with just a little extra. 


Whole wheat bread is very dense, do not be disappointed if there is no large peak or your bread doesn't look like store bought bread. It isn't store bought, it's homemade! It will not be super tall nor will it be as airy as store bread. 
So good though. I love to toast two pieces and put a little coconut oil spread on it in the morning for my breakfast. And added bonus, it keeps you full longer because of the amount of fiber within it. 

Happy Baking!